
Michael Pollan, author of The Omnivore’s Dilema and Cooked said ‘We do find time for activities we value, like surfing the Internet or exercising... the problem is we’re not valuing cooking enough. Who do you want cooking your food, a corporation or a human being? Cooking isn’t like fixing your car or other things it makes sense to outsource. Cooking links us to nature, it links us to our bodies. It’s too important to our well-being to outsource.’
Coming from a family that is PASSIONATE about food, where we all cook, all my uncles, aunts, cousins (male or female) brothers and parents, I admit that I find it odd that one wouldn’t cook. When I started researching this article I did not anticipate the wide range of opinions that flowed in from friends and acquaintances on the subject of cooking for oneself, your family, and of kids in the kitchen. By kids, I don’t mean those under 10 for whom baking cakes and cookies, making pancake breakfasts or pizzas from scratch hold some kind of magical appeal, and are always eager to help. No, the ‘kids’ I am referring to are those on the brink of venturing out into the world and those who are on the eve on reaching their third decade. My question — posted in various forms of social media and in the forms of emails — was simple: Do your teenage children cook? Can they make a meal for themselves? If they do, what do they like to cook?
The answers I received ranged from “can’t cook, can’t clean and has no interest’, to ‘my daughter decided to make an entire meal from Thomas Keller’s cook book last week!’ and all points in between. There were many, many, though who did not cook at all and saw no necessity in learning. I was surprised by this as I view cooking as an essential life skill. I quickly realized that many people do not hold this to be true—as I was told in a very energetic fashion by a non-cooking friend of mine—“I feed myself perfectly well without being able to cook!”
This simple question produced some pretty strong answers: “It’s not an essential skill” or “Kids with no interest in cooking can survive without knowing how to cook” and, “My kids don’t have time to cook, they’re too busy with their school schedules and after school activities – they can learn later” and, “I think it’s important but in today’s environment it’s not essential,” on the other hand, “It’s absolutely an essential skill, one you cannot live without,” or “all my children know how to cook – I don’t understand why you wouldn’t”. These passionate comments and some rather energetic discussions held around, what else, the dinner table, led me to do some more research.
There are multitudes of websites and books that tout the benefits of children and young adults knowing how to cook; everything from building one’s self-esteem, encouraging you to try new foods, connecting with your family around a table with no intrusions from the outside world, saving you money, keeping you healthy and being creative.
However, it seemed that the very people this research was aimed at, were not asked what they thought themselves. When I posed the question of my two teenage children (aged 17 and 14) they answered ‘Absolutely essential so that you can be independent. You won’t always have someone there who can cook for you!’ (the 17-year old) and ‘not if I can help it, unless it’s chocolate cake or shortbread!’ (the 14 year old). Some teens I spoke to seemed to have an ambivalent attitude. They liked the idea of it, but not the effort. They know they should make better food choices but often grab what’s easy and close to hand, pre-packaged and preferably salty or sweet. Asked about making salads or cooking vegetables, one young man said “I don’t like green things, I hate broccoli but spinach is okay I guess. I usually close my eyes and hope for the best when I find it in a dish!’ Many liked baking, but not the cleaning up part. I was feeling a little despondent – where were the future budding cooks? Are we destined to have a generation of non-cooking, micro-wave-food-zapping-eating-while-walking teens on our hands?
I think not. I came across a website all about cooking teens with engaging writing, enticing them to try – amongst other things – kale! In the mood for something salty and crunchy that’s fresh and crispy too? How about kale chips … that you make at home. We hear you laughing from here. Kale? As a chip? Yes, ye of little faith. Turns out that if you prep it right, the curly green collection of cruciferousness crisps up after barely 10 minutes in the oven. And if you season it right, well, let’s just say that our testers (a teenager who doesn’t care for cruciferous veggies, particularly when they’re cooked, and his mom, who really appreciates a nice chip) polished off what amounted to an entire bunch of kale, scarfing down the chips the way some people (not us, of course…) shovel in popcorn at the movies. www.cookingteens.com My daughter tried them. They were a hit. Perhaps getting my son to eat a green vegetable might not be so hard after all.
I think that Mark Bittman said it best in Cooking Solves Everything: “When people make food a priority in their lives, they actively contribute to society. Cooking can change our collective lives for the better. It can even change the planet for the better. And this is not hyperbole. In reality, being able to feed yourself (and your near and dear) is a simple and satisfying act at the core of our humanity. Spending time in the kitchen demonstrates our independence, self-reliance, and self-determination as a species. So it’s hard to understand why we would willingly give all that up for a box of (insert name of instant dinner in a box here).”
When I was a kid at home we had a rule - cooks don’t wash up – which was fantastic, as I couldn’t stand doing the dishes. Perhaps that helped encourage me to be adventuresome in the kitchen. I know that some of my early creations were binned, tossed away as inedible (a rather hideous vinaigrette made with cottage cheese comes to mind), but I was always encouraged to try again, even when I used nearly all the pots and pans in the kitchen.
So after all this ruminating and questioning, when it came down to cooking basics and what they (the kids) would like to know how to cook, if they had to or preferably want to, these were some of the dishes they asked for. They all agreed that they should be simple and quick, with few pots, pans or utensils for easy clean up.
I think I’m going to encourage my kids to have fun in the kitchen … and yes I’ll do the dishes!
Creamy Scrambled Eggs
Serves 2 people
4 eggs
½ tablespoon butter
Salt and pepper
Penne Pasta and Cheese
Serves 4 people
1 lb penne pasta
2 ½ oz butter (5 tablespoons)
3 oz flour
2 cups milk (warmed)
6 oz grated Cheddar or Gruyere cheese
4 slices ham or prosciutto – cut into small pieces (optional)
Salt and pepper
Roasted Chicken, Vegetables and Potatoes
Serves 4 people
1 large yellow onion – peeled, halved and sliced
4 whole chicken legs
3 large carrots – peeled and thinly sliced
2 large zucchini – rinsed, halved and sliced
1 lb small potatoes – rinsed and halved
Olive oil
Salt and pepper
4-5 springs fresh thyme (optional)
Preheat the oven to 400 degrees.
Place the chopped onion into the bottom of a medium sized oven-proof dish (a Pyrex dish or small roasting pan works well). Place the chicken legs on top of the sliced onions. Place all the vegetables over and around the chicken legs. Add the thyme to the dish if using.
Drizzle a little olive oil over the top of the chicken legs and the vegetables. Sprinkle a good pinch of salt over the top and 4-5 grinds of black pepper.
Place in the center of the oven and roast for 1 hour, turning the chicken legs and vegetables over a couple of times during that time. Serve hot.
Simple Mixed Green Salad
Serves 4 people
2 teaspoons Dijon mustard
3 tablespoons olive oil
1 tablespoon cider vinegar or other light vinegar of your choice
Salt and pepper to taste
8 oz mixed salad greens
Place the mustard in a large salad bowl. Slowly drizzle in the olive oil and vinegar, and whisk until the vinaigrette resembles the consistency of a light mayonnaise. Add salt and pepper to taste. Place salad servers over the vinaigrette.
Add the mixed greens to the salad bowl, on top of the servers. When you are ready to serve the salad, toss the salad so that all the ingredients are well combined.
You can make all sorts of variations of this salad by adding feta cheese, sliced apples or sliced almonds to the salad for example.
One pan, flourless chocolate cake
Serves 8 people
8 oz dark chocolate – chopped into small pieces
8 oz unsalted butter
6 oz sugar
4 eggs – lightly beaten in a small bowl
Cocoa Powder
Preheat the oven to 325 degrees. Line a small square, or 8” round cake tin, with parchment paper.
Place a medium-sized saucepan over low heat. Add the chopped chocolate and butter, and cook, stirring frequently until completely melted and smooth. Add the sugar to the chocolate mixture and cook until incorporated and smooth once more.
Remove from the heat, let the mixture cool down for at least 5 minutes and stir in the beaten eggs. (If the chocolate is too hot the eggs will scramble)
Pour the cake mixture into the prepared cake tin. Place the cake in the center of the oven. Bake for 30 minutes or until the cake is firm to the touch.
Remove the cake form the oven, let cool for 5 minutes and then invert it onto a cake plate. Remove the cake tin and parchment paper. Let cool for 20 minutes before dusting with cocoa powder. Serve with crème fraiche or vanilla ice cream, or both.
Note: It will still be very moist so that a knife inserted will not come out completely clean.
Written for Edible Santa Barbara - Fall 2014 Issue
Many years ago I spent the late summer and early autumn months in the South of France in a little farmhouse situated not far from the sea. Every day I’d walk down to the sea for a swim, past the field that was overflowing with vast numbers of tomato plants and a quarter acre of melons. After my swim I would walk back past the same field, still filled with an abundance of ripe tomatoes and all those succulent fruit. On rare occasions I would see the owner filling a basket. There were hundreds and hundreds of tomatoes and an equal number of melons lying in the fields. Well, after masses of hand wringing, I couldn’t help it; I just had to help that harvest along. If I didn’t eat them, who would? I made tomato and melon salads for weeks. It was a guilty pleasure.
Friends know I love making jam and I often find unexpected gifts on my doorstep. A friend called me recently and said, “would you like some lemons? – I have lots of them.” I said I would. A few hours later a 50 pound bucket of assorted lemons sat by my front door. I quickly learned that you need to qualify a lot. We made marmalade. Another friend offered a lot of figs—again I envisioned a large basket, enough to make jam. In this instance a lot meant about a dozen. No jam then, but a lovely tart. So what does one do when you have an overabundance of a single fruit or vegetable?
In the garden of my old house there was a prolific plum tree that annually produced well over 75 pounds of plums. We would check the tree daily and wait for the perfect moment to pick all the gorgeous fruit. The kids loved climbing the tree to pick those out of reach plums. Every year a good friend of mine, and her three daughters would come over for the annual plum jam making session. Sitting around a wooden table set up in the garden, we’d spend a couple of hours cleaning and chopping up all the fruit. It was always a convivial-fun-laughter-filled-fingers-tinted –purple afternoon. The reward for everyone taking part was jars of plum jam to take home.
We’d make jam, chutney and myriad desserts with the fruit, which of course all ripened at once. I gave away buckets full too. These are the pleasures of owning fruit trees or planting a garden. You can share your bounty.
I have now moved across town and have discovered the edible treasures of my new garden. I lost the plum tree but gained an apricot tree. This was a huge treat, for apricots are quite possibly one of my favorite fruit. When I first saw the tree I immediately envisioned bushels of apricots that could be turned into preserves. I didn’t count on battling the birds that waited patiently every morning for their sweet breakfast, and the netting I put up was not up to the task of keeping away the merrily chirping birds. The apricots that remained however were incredible, reminiscent of those in my grandmother’s garden. Dark gold in color, with the taste of liquid honey. Unfortunately there weren’t quite enough to make the hoped for preserves. As luck would have it, a friend, who lives a few blocks away, had an abundance of apricots and generously offered up some of her fruit. We spent an hour together, in the afternoon sun, picking and discussing the merits of different types of canning, pectin or no pectin, varying methods of jam making and old family recipes, while her dogs scampered around our feet.
Once home, I combined all the fruit and made a batch of my grandmother’s jam. I ate a spoonful and was transported back to her kitchen. A kaleidoscope of images flickered through my mind as I remembered our conversations with the family gathered in her garden picking and cutting up fruit, of learning to make jams and sealing jars with melted paraffin wax. All of these tastes and memories tied to an abundance of fruit!
Recently some good friends surprised me with a new raised vegetable bed. A flurry of planting, weeding and tending young shoots followed. My approach to gardening tends to be plant it and let it grow, without too much tending and nurturing which might explain why my garden produces haphazard results. The squash plants died in a matter of weeks. Some bug apparently. The arugula was and is fabulous, peppery but has a tendency to bolt. The tomatoes aren’t getting enough sun (my mother will interject here “I told you so”) resulting in a meager harvest. The kale on the other hand went bonkers. I made lots of roasted kale salads. I also discovered that it’s easier to give away apricot jam that bags full of kale.
Then there is the apple tree. As of this moment it is producing gargantuan apples weighing in at close to 1 pound a piece. We are an apple crumble mad family, however I’ve discovered that there’s only so much apple crumble one family can eat. I usually need 8-10 apples to make a crumble. I use three of these. I think it may be time for a new tradition – apple butter anyone?
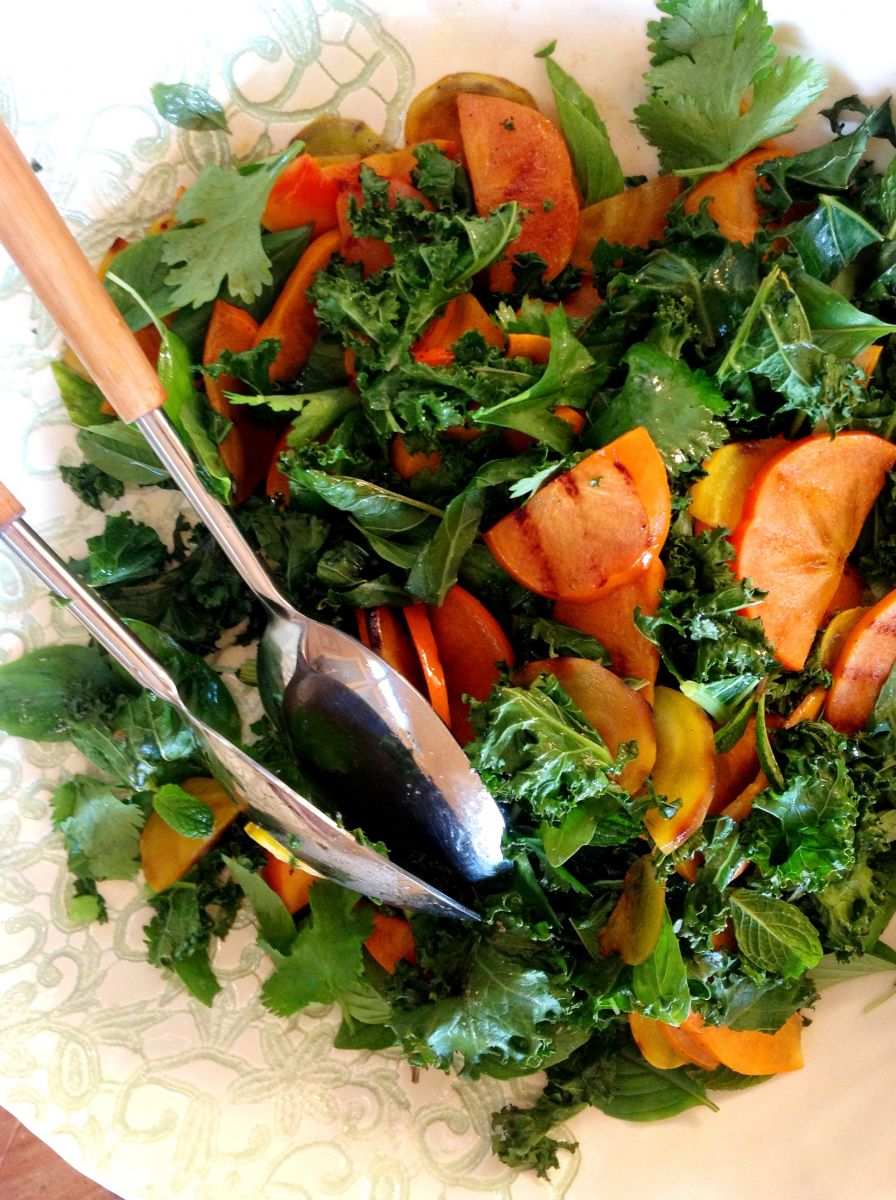
Roasted Kale and Grilled Persimmon Salad
This is one of the kale recipes I made with the prolific plants from the garden. If you have access to a fuyu persimmon tree you are in for a treat. This is another fruit tree that I covert – maybe I can find a spot to squeeze on in!
Serves 8 people
6 fuyu persimmons – halved and sliced
4 golden beets – peeled, halved and sliced
Olive oil
Coarse salt
Black pepper
1 large bunch curly kale – stems trimmed and the leaves cut into thin strips
1 lemon – halved
1 tablespoon red wine vinegar
1/2 cup fresh basil leaves – left whole
1/4 cup fresh cilantro leaves – left whole
1/4 cup fresh mint leaves – left whole
1. Preheat the oven to 350 degrees.
2. Place the sliced persimmons and sliced golden beets into a salad bowl with a drizzle of olive oil, a pinch of salt and some black pepper. Toss to coat evenly.
3. Place a cast-iron griddle on a stovetop over high heat. Once hot, add the sliced persimmons and beets (you may need to do this in two batches) and cook for 2-3 minutes on each side. Once cooked place them on a plate.
4. Place the chopped kale onto a sheet pan/cookie sheet. Drizzle with a little olive oil, sprinkle a little salt over the top and add a little pepper. Place in the center of the oven and roast for 8 minutes. As soon as the kale is cooked, remove from the oven and squeeze the lemon all over the kale.
5. Combine 3 tablespoons olive oil and the vinegar in the bottom of a salad bowl and whisk together well. Place salad utensils over the vinaigrette. Place the grilled persimmons and beets, and roasted kale on top of the utensils. Add all the herbs to the salad bowl. When you are ready to serve, toss the salad well.
ROASTED ROOT VEGETABLES WITH HERB PESTO
My son and I planted carrots as they are one of the few vegetables that he really likes to eat. This is one of the dishes I made with the first carrots of the season. Now I just need to master the art of growing parsnips and squash and then I’ll have everything I need at my fingertips. A good goal for next year.
Serves 8-10 people
For the vegetables:
3 yellow onions – peeled, halved and thinly sliced
1 butternut squash – peeled, halved, seeds removed and then cut into 1-inch pieces
5 - 6 carrots — peeled and sliced
6 small to medium parsnips — peeled, quartered and sliced
1 large red onion — peeled, halved and cut into thin slices
5-6 springs of thyme
Olive oil
Juice of 2 lemons
Salt and black pepper
For the herb pesto:
4 tablespoons fruity olive oil
Juice and zest of 2 lemons
1 large handful parsley — chopped
1 large handful cilantro — roughly chopped
1 large handful basil leaves
2 tablespoons chives — chopped
1 clove garlic
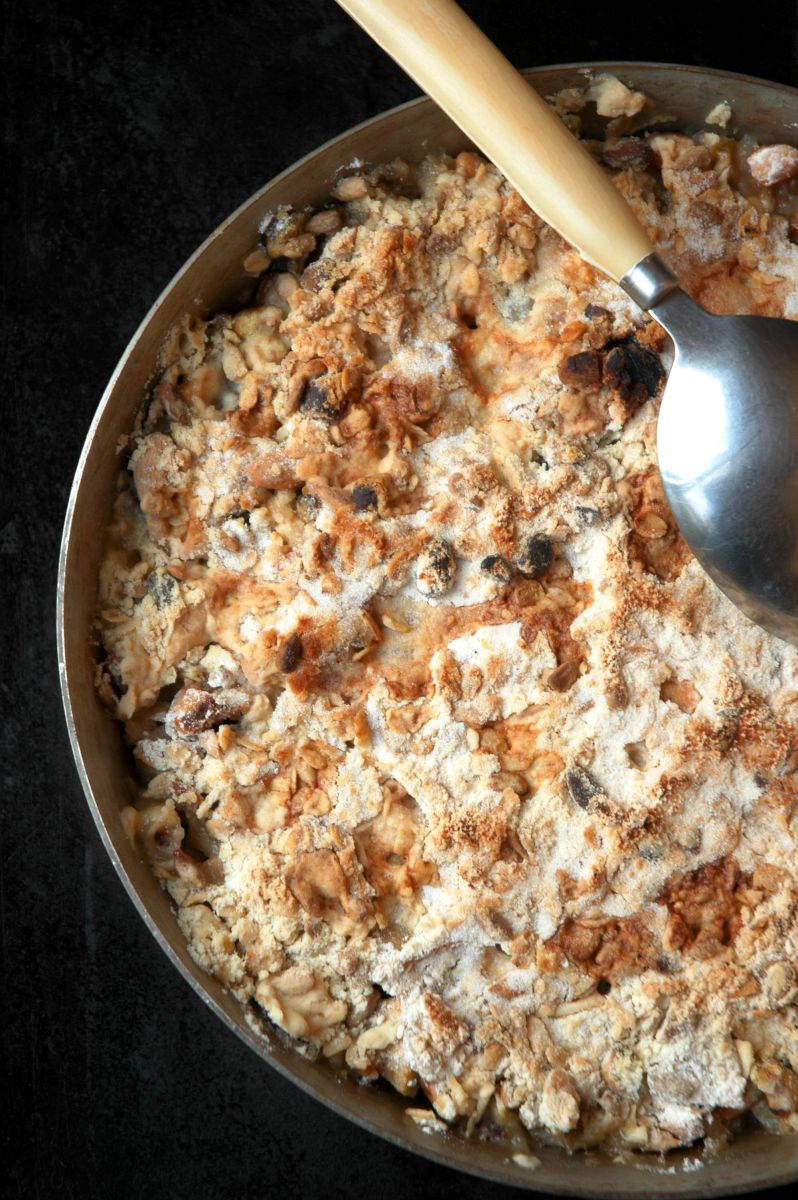
APPLE AND ALMOND CRUMBLE
This is a lovely variation of classic apple crumble. Given the number of apples the one tree in my garden produces, I think I may have to create some many more versions.
Serves 8-10 people
6-7 large apples – peeled, cored and sliced
1/3 cup golden raisins
Zest and juice of 1 lemon
½ cup water
Honey
1 cup almond meal or almond flour
½ cup flour
1/3 cup almonds – roughly chopped
1 1/3 sticks butter – cut into small cubes
Written for Anglotopia.com
What’s for pudding, Mum?
This question is asked on a daily basis across the British Isles where they are exceedingly fond of a good pudding. But what exactly is pudding and where did it come from? Coming from America, pudding means a creamy, custard-like mixture; pudding in England can mean a multitude of things. The esteemed Oxford English Dictionary definition runs nearly a third of page of minute type describing it as everything from “the stomach or intestine of a pig, sheep, etc. stuffed with minced meat, suet, oatmeal, seasoning, etc. , and boiled” to “a cooked dish of various sweet or savory ingredients, esp. as enclosed within a flour-based crust or mixed with flour, eggs etc., and boiled or steamed; a baked batter mixture. Now also, the sweet course of a meal.” From Blood Sausage, Yorkshire Pudding and Haggis to Eton Mess, Flummery and Spotted Dick, puddings in England run the gamut from spiced, offal-filled sausages to cream filled concoctions dotted with fruit. It’s understandable that one might get a little confused.
A short history of puddings.
Historians usually agree that the first puddings were savory sausages. The word is derived from the French word boudin (black pudding) which came from the Latin bollutus (sausage or small intestine). So how did we get from a sheep stomach filled with organs and oats to a fruit filled dessert? Modern technology was the answer, even in the early 1600s. With the arrival of a pudding bag or cloth, animal stomachs were no longer needed to boil various culinary concoctions, and English chefs went to town creating myriad sweet treats. The British became well known for their desserts—whether they were created to ward off the chill of British winters or to satisfy a national penchant for sweets—as noted in the late 1690’s by a French writer and traveler named Francois Maximillien Misson. They bake them in an oven, they boil them with meat, they make them fifty several ways: blessed be he that invented pudding for it is manna that hits the plates of all sorts of people; a manna, better than that of the wilderness, because the people are never weary of it. Ah, what an excellent thing is an English pudding!
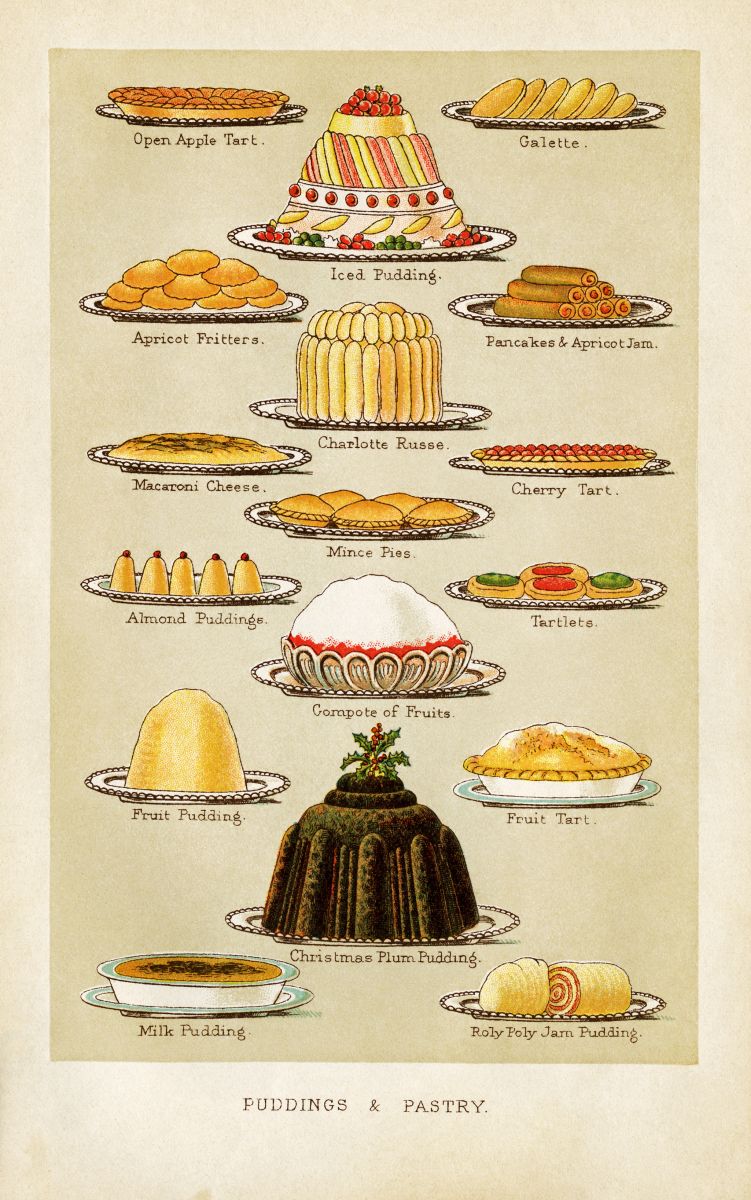 By the nineteenth century, puddings had expanded from those made with suet and usually boiled, to include sponge puddings, all manner of dishes made with bread, flans, batters and meringues. Boiling was no longer the only cooking method as more homes had ovens. Indeed some puddings were not cooked at all. For example Summer Pudding consists of a bowl lined with berry-juice-soaked bread and then filled with summer berries. This dish, once popular in health spas, was originally known as the rather unpleasant sounding hydropathic pudding—dessert for those on a diet if you will. Thankfully it was renamed and is still known as Summer Pudding today.
“English puddings have been famous for hundreds of years, and rightly so.” writes Arabella Boxer in her Book of English Food (1991). Her book is filled with such delights as Apple Hat, Castle Puddings and the famous Bakewell Pudding. The latter is synonymous with the town of Bakewell in the Peak District. It’s actually a tart—the shell is filled with a layer of jam, usually raspberry, and then topped with an egg-almond filling. The first known printed recipe dates back to the early 1830s and is still enormously popular today. Bakewell is located near Chatsworth House, home of the Devonshire family. In 2003 the Duchess of Devonshire and the chefs at Chatsworth House wrote a cookery book in which one finds a number of very traditional puddings, including one for Apple Compote with Black Treacle and Devonshire Cream. The Duchess describes the compote as, “This is all a pudding should be – sweet, sour and creamy. Black treacle is the same thing as molasses – good for horses and for us!” No wonder treacle puddings are so popular and apparently the Mayor of London’s favorite dessert as well as Harry Potter’s.
Fruit have always played an important part in English desserts from flavoring creams, known as “fools,” to pie fillings. You’ll find, for instance, across the British Isles, many apple-filled puddings including Apple Goody. In 1961, Helen Cox described the dish in her book Traditional English Cooking as follows “This is an old English recipe that is as Goody as it sounds… it could be a dangerous rival to the well-established Apple Pie.” The English are very fond of their apples, in particular the marvelous Bramley’s. They are only grown commercially in the United Kingdom, so much so that ninety-five percent of all cooking apples sold in Britain are this variety. British cookery books describe all sorts of apple dishes including apple crumble, made popular during WWII, created due to rationing of butter for more traditional pies. While reading about crumbles, I came across this wonderful whimsical description by Hugh Fearnley-Whittingstall: These homey puds are certainly not fine patisserie. They’re designed not to seduce the eye so much as to have rural rumpy-pumpy with your tastebuds. And they’re perfect for the pastry-challenged. There’s no rolling, no wrestling with tricky dough, no blind baking. Just a bit of chopping and mixing stands between you and hot, fruity pleasure. The crumble is, rightly, a national institution. So it’s surprising that we’ve only really been making them since the second World War. We’ve even exported them to France, where they can’t get enough of “le crumble.” Our humble, bumbling, tummy-rumbling crumble now rubs shoulders with crème brûlée and tarte au citron. And so it should. Marvelous isn’t it!
This is a variation of the crumble my mum taught me to make when I was little. It makes me want to brew a pot of tea, grab a good book, sit by a fire and enjoy a ‘tummy-rumbling’ crumble.
Serves 8 to 10 people
4 pears – peeled and chopped
4-5 apples – peeled and chopped
1/2 cup golden flame raisins
Juice and zest of 1 lemon
1/2 cup water
2 cups flour
8 oz butter (2 sticks) – cut into little pieces
1/3 cup toasted sunflower seeds
1/4 cup roasted pistachios – roughly chopped
1/3 cup rolled oats
1/3 cup almonds – roughly chopped
3 tablespoons sugar
1. Preheat the oven to 400 degrees.
2. Place the chopped fruit, raisins and lemon zest in a deep oven-proof baking dish. Pour the lemon juice and water over the fruit.
3. Place the flour and all but 1 tablespoon of the chopped butter in a large mixing bowl. Mix the butter into the flour using your fingertips until it resembles coarse breadcrumbs. Don’t worry if there are lumps of butter. It should look like that. Add the sunflower seeds, pistachios, oats, almonds and 2 tablespoons of sugar and stir well to combine.
4. Spoon the crumble mixture over the prepared fruit. Dot the surface of the crumble with remaining pieces of butter and sprinkle the remaining sugar on top.
5. Bake in the center of the oven for 40 minutes or until golden brown. Serve warm. It’s also really good with a dollop of creme fraiche or vanilla ice cream.
The 1890 edition of Isabella Beeton’s Book of Household Management lists hundreds of puddings, of which there are no less than six versions of Bread Pudding. They all include soaking the bread in a liquid, usually milk, and then pouring a spiced egg batter over the top and baking it. It’s perfect for using up day old bread. Versions of this type of pudding date back hundreds of years and exist all over Europe. Evidently, everyone has had the same idea of mopping up all the good juicy bits in the bottom of a platter or using the bread (trenchers, sops and focaccia) as part of a dish.
No discussion of British desserts would be complete without delving into steamed puddings of which Spotted Dick is one of the most well-known, if only because of its quirky name. This pudding was first written about in 1849 by the famed French chef Alexis Soyer, then at the helm of The Reform Club in London. The pudding—sometimes known as “spotted dog” or “plum bolster”—is a steamed spongy dessert made with flour and suet, spotted with fruit, usually dried currents and sultanas. There have been many discussions about its name, one of which is that the “Dick” in Spotted Dick comes from the shortened old English or Scottish name for pudding: puddog or puddick. There are other more risqué definitions! It is similar to a Roly-Poly, a pudding familiar to anyone who has read Beatrix Potter’s The Tale of Samuel Whiskers.
But perhaps the most famous pudding of all is Christmas Pudding. Traditionally served  on Christmas Day, this pudding takes weeks, in many cases, months to mature before it is served. It consists of a large assortment of dried fruit that is mixed with suet, spices, treacle, egg and brandy or other alcohol. These puddings used to be boiled in a pudding cloth, hence the cannonball shape you may see in old engravings or paintings that predate the Victorian era. They are now made in pudding bowls that are wrapped and steamed. Charles Dickens described the arrival of the pudding in A Christmas Carol (1843). "Mrs Cratchit left the room alone -- too nervous to bear witnesses -- to take the pudding up and bring it in ... In half a minute Mrs. Cratchit entered -- flushed, but smiling proudly -- with the pudding, like a speckled cannon-ball, so hard and firm, blazing in half of half-a-quarter of ignited brandy, and bedight with Christmas holly stuck into the top.” It’s a scene that has changed little over the past two centuries.
There are regional puddings, seasonal puddings and everyday puddings. Ask any Brit about their favorite pud and you will get a hundred different delicious answers. So, what’s yours?
When I was growing up, barbecues were something that occurred rarely and usually on a special occasion. They were not an every weekend occurrence. They were neither practical in rainy London, nor easy to produce as few people had a trusty Weber (or its equivalent) tucked away in their homes. In fact I can safely say that we never cooked a barbecue in London in all the years that I lived there.
You might find it odd then, that I am writing about grilling food but bear with me. My earliest memories of barbecues come from France, specifically in my grandparent’s garden, in August, where the family would gather for an annual get-together. Lunch in the garden at their house took on epic proportions. The location for the pique-nique/barbecue was some distance from the kitchen so everything had to be prepared ahead of time and carried en masse to the designated spot. My grandmother had plates, table linens (yes there were tables) for such an occasion.
All the men in the family would gather around a rickety barbecue to prepare the braise, (you know the moment when the coals are perfect for cooking over, red underneath and covered in white ash) much discussion ensued as to the perfect way of doing this. Smoke would billow around and sometime later an announcement would be made, “c’est pret” – It’s ready. With this came a flurry of activity, the women ferrying the dishes to be cooked, over to the barbecue. The men doing the cooking with a constant banter going backwards and forwards between the two as to when the meat was ready. This banter doesn’t change by the way whether you’re in France or in the United States. My grandmother always prepared lamb kebabs, tiny lamb chops and merguez sausages. Each of these had their own particular preparation, Herbes de Provence here, a dash of Dijon mustard there and so on. The grillade would then be served with a variety of salads, accompanied by chilled rosé, followed by a sampling of cheese and the an afternoon siesta under the trees. It was chaotic, magical and delicious.
Up to this point in time I had never actually grilled anything. Prepared the food yes – grilling it, non! I finally got my chance some years later staying at our old farmhouse in the South of France with my brother and some friends. We decided to make a barbecue in the outside fireplace on the terrace. The extremely old fireplace had a few missing bricks, and the chimney wasn’t exactly straight. To say that it didn’t draw well would be an understatement. Much discussion ensued as we prepared the braise. A considerable time later we finally deemed it ready to cook on. We made, as per tradition, tiny lamb chops and merguez. Our eyes stung, we coughed a lot, we debated when the meat was ready (apparently this is not a generational thing) there were a few charred bits, but we were thrilled with the result. We sat under the vine-covered terrace, drinking chilled rosé, laughing at our attempts. This ritual was to be repeated annually.
You can imagine therefore, my surprise, when I first arrived in California, to not only see a barbecue in everyone’s garden, but to discover that they were actually used more than once a year. These gleaming cauldrons were also (in theory) so much easier to get going than the ones I had been used to in France. I was smitten and purchased a chic black Weber. I felt empowered and invited my new American friends over for a barbecue. I prepared lamb kebabs and merguez sausages served with salads. Isn’t this what everyone cooks on the grill? This was 1985 in Los Angeles. I remember a few quizzical looks – what? no hamburgers, no Tri-Tip, no hot-dogs, no buns? It wasn’t until I started going to other peoples barbecues that I discovered a whole new realm of cooking outdoors. I had never seen tri-tip, let alone tasted it. Ribs were a revelation. An architect friend of ours cooked an extraordinary whole filet mignon on his grill. Then there was corn-on-the-cob with melted butter. There were grilled vegetable salads with charred onions, corn and tomatoes, and there was grilled ahi, salmon and Santa Barbara shrimp. The taste of summer took on a whole new dimension.
I started to experiment and barbecued everything in sight. I made what I called ‘veggie packs’, basically tons of summer vegetables all chopped up and placed inside a foil pouch, drizzled with olive oil and herbs and cooked over hot coals. Once cooked, I’d pour a mustard vinaigrette over the top, my version of the grilled salad.
My trusty weber is still in my garden. It has a few dings in it and show signs of wear. I am still perfecting the art of getting the barbecue going correctly, but I love cooking outside, even if the smoke drifts into your eyes now and then. I love the taste of grilled vegetables and the charred bits on corn, and, once a year, I still make tiny grilled lamb chops, lamb and beef kebabs and merguez sausages.
GRILLED PEACH, HEIRLOOM TOMATO AND ARUGULA SALAD
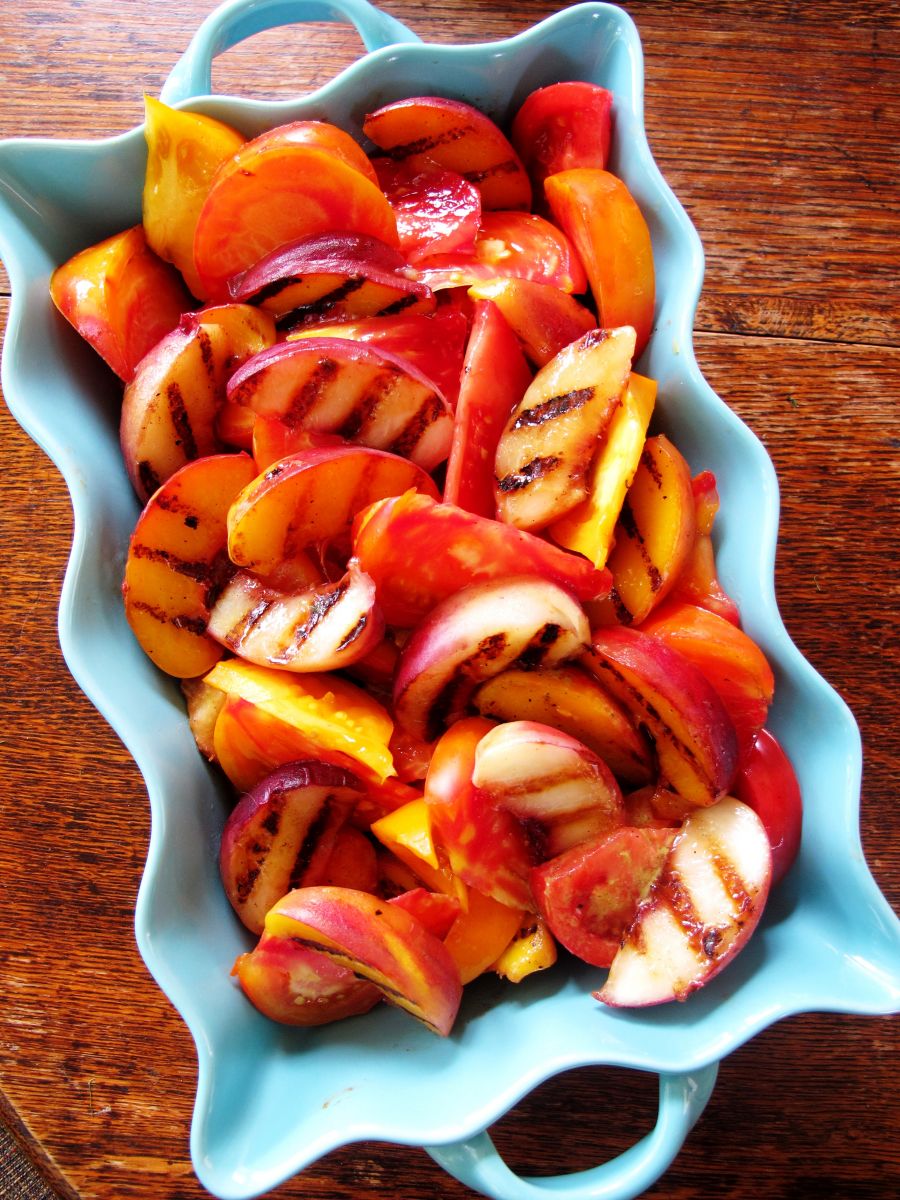
This is a variation of the salad that’s on the cover of my Summer cookbook. I love the combination of tomatoes and peaches and have made many versions of that salad. I particularly like this one. Grilling the peaches intensifies the sugars in the fruit and gives it a slightly charred-caramel taste. The sweetness of the fruit is delicious against the peppery arugula.
Serves 8 people
For the pesto vinaigrette:
4 tablespoons olive oil
Juice and zest of 2 lemons
1 cup arugula leaves – roughly chopped
1 cup basil leaves – roughly chopped
Pinch of coarse salt
For the salad:
2 lbs large heirloom tomatoes – approximately the same size as the peaches, halved and cut into wedges
4-6 large peaches – halved pitted and cut into wedges
2 tablespoon olive oil
Salt and pepper
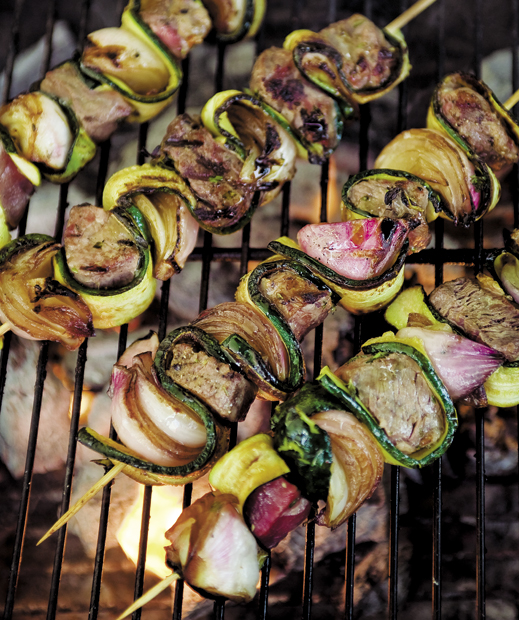
MARINATED SKEWERED GRILLED BEEF AND GRILLED VEGETABLES WITH HERBED FILLED MAYONNAISE
This is a delicious way of preparing beef for a grill. A lot of the preparation can be done in advance and the recipe multiplies easily if you are serving a large crowd.
Serves 8 people
For the beef:
¼ cup olive oil
8-10 stems (¼ cup) fresh oregano – chopped
10-12 stems (¼ cup) fresh thyme – chopped
Freshly ground pepper
Coarse salt
2 lbs rib eye beef - cut into 1 inch cubes
For the onions:
8 medium sized red onions – peeled and quartered
Olive oil
1 teaspoon Vincotto or a sweet vinegar, such as a balsamic
Salt and pepper
For the zucchini:
8 medium sized green or yellow zucchini or a mixture of both – ends trimmed and thinly sliced
Olive oil
Salt and pepper
.jpg)
For the tomatoes:
16 small to medium tomatoes – preferably different varieties – cut in half
8 long rosemary stems – left intact
Coarse salt
Fresh pepper
For the herb filled mayonnaise:
1 egg yolk
2 tablespoons Dijon mustard
2 tablespoons vegetable oil
Olive oil
Juice of 1 lemon
1 bunch flat leaf parsley (1 cup) – finely chopped
8-10 sprigs de-stemmed (½ cup) fresh oregano – finely chopped
1 small bunch fresh cilantro – finely chopped
Salt and pepper
O R I G I N S : Mayonnaise has a number of possible origins. It has been said that Duc de Richelieu or his chef created the sauce after capturing the port of Mahon on the island of Minorca in 1756, and named it Mahonnaise. But other historians contest that theory and say it comes from The Duke of Mayenne in 1589 who took the time to finish his lunch of chicken with cold sauce before he went into battle and thus the sauce was named after him! Either way the sauce is an emulsion of egg yolks and oil.

We were sitting upstairs in the café, close to the bar surrounded by posters of Marcel Pagnol’s films with succulent aromas drifting across the dining room from the open grill. Pagnol celebrated convivial meals in his films and this Californian bistro captured that joie-de-vivre. They had a simple green salad with warm goat cheese on the menu and I started my lunch with that dish. The salad was crisp, fresh and filled with a variety of tender greens. The goat cheese was creamy and herbaceous. The flavors were clean and light. It was the first time I tasted Alice Waters’ food. This was 1984 in Berkeley. I took one mouthful of that salad and I was transported back in time to my childhood in France.
My love of salads started at a very young age. My grandmother made a simple, sweet, juicy carrot salad. Every time I see grated carrots I think if her, of sitting her kitchen watching her as she cooked. Every child in France grows up eating this salad and I was no exception. I loved it. From there I graduated to a simple green salad with a little vinaigrette, then added herbs, and then salade mesclun, which had tasty lardons in it. As we travelled around France and other parts of Europe I tasted regional specialties: Arugula salad with bresaola, prosciutto-melone in Italy, Buffalo mozzarella with tomatoes and fruity olive oil in Venice, white asparagus in many guises in Austria, and what soon came to be a French bistro classic, a mixed green salad with warm goat cheese which I ate whenever I had the chance. For me this was the epitome of a great salad. It was the dish I could always count on.
One day—now a teenager in London—I went to this hip new American restaurant in the center of town. It was located in a basement, had bare brick walls, wooden floors and black and white photos of stars of stage and screen. It had food I had never seen before: buffalo chicken wings, ribs with black-eyed peas and corn bread, and Caesar salad. ‘Try the salad’ my father said, ‘you’ll like it’. I was a little reluctant but I wanted try this American food and be ‘cool’. The salad was fabulously garlicky, had crunchy croutons and was assembled by the deft handed waiter tableside. I was hooked in an instant. A salad without a classic vinaigrette, this was so different! I laugh when I remember this but at the time it was a revelation. More were to come as I travelled to California and ate grilled vegetable salads with slightly-charred-freshly-shucked corn and tomatillos, Chinese chicken salads, chopped salads with creamy avocadoes the likes of which I had rarely tasted and peculiar salad dressings such as thousand island and green goddess.
I have viewed salads differently ever since then and I like to draw on dishes, spices and flavors from around the world to create new combinations and new dishes. Walking through the farmers market also provides ample inspiration. The spring is one of my favorite times of year for salads. This is a time when fava beans flourish, asparagus is abundant, peas pop and if we are lucky enough to finally get some rain we may get a burst of wild mushrooms. A salad filled with sautéed chanterelles is one of my favorites, although when I first come across those sensational-looking, sweet and juicy heirloom tomatoes I have trouble resisting them too. There are just so many choices and perhaps that is why I enjoy salads so much. They offer endless combinations, you feel so healthy when you eat them and they are good for you!
I was once asked ‘if you were stuck on a desert island and could only have one thing to eat, what would it be?’, ‘Warm goat cheese salad’ I replied without hesitating. You see I adore goat cheese and the cheese combined with almost any salad is one of the most perfect food combinations. If it’s warm the cheese melts ever so slightly, and when you combine that with fresh greens, some chopped chives and a light mustardy vinaigrette you have a delectable mouthful every time.
In 1902, George Ellwanger—a prominent horticultural scientist—extolled in his book Pleasures of the Table, “To remember a successful salad is generally to remember a successful dinner; at all events, the perfect dinner necessarily includes the perfect salad.” A quote I try to live up to, from the simplest meal to a more elaborate celebration or even on a desert island.
WATERCRESS AND SPRING PEA SALAD
One of my cousins in France told me she thought it was odd that I put fruit in my salads. I asked her to taste the peach and tomato salad I made for her and she has been a convert ever since. This salad has blueberries and mint, and a little zing in it. It’s very refreshing!
Serves 8 people
Zest and juice of 1 lemon
3 tablespoons olive oil
Salt and pepper
1 lb fava beans — shelled (you will need to remove the beans from the pods, and then the outer shell of the fava bean — it’s easier if you blanch them first for 2 minutes)
1 lb English peas — shelled
2 bunches watercress — stems removed
2 good handfuls mint leaves — left whole — try to use just small leaves
½ bunch cilantro — leaves left whole
2 baskets blueberries
4 oz feta cheese — crumbled
GRILLED ZUCCHINI AND TARRAGON ROASTED CHICKEN SALAD
Poulet a l’estragon (tarragon chicken) was — actually still is — one of the dishes that I always looked forward to when visiting France. It’s classic bistro fare, or cuisine bourgoise. In other words, good home cooking. Deft use of the herb is key, as the slightly anise flavored herb can be overpowering if used in large quantities. I always think of tarragon as the quintessential French herb. It’s used in a number of classic sauces, Bernaise being the most well-known.
This salad pairs moist tarragon roasted chicken with grilled zucchini and a mustardy vinaigrette.
Serves 8 people
1 3 ½ lb chicken
2 yellow onions — peeled and thinly sliced
Olive oil
4 sprigs tarragon to roast with the chicken plus the leaves from 1-2 more stems for the finished salad
Salt and pepper
5 zucchini — ends trimmed away and then sliced on a bias.
1 tablespoon Dijon mustard
4 tablespoons olive oil
1 tablespoon tarragon vinegar or white wine vinegar
ROASTED TOMATO AND OLIVE SALAD
I love slowly roasted cherry tomatoes. I use them in lots of dishes from pasta to crostini. Their flavor is intensified and they become rich and juicy. Add them to any salad and it transforms the vinaigrette as the juices from the tomatoes melt in with the salad. The olives are tasty salty counterpoint.
Serves 8 people
1 lb small tomatoes
1 teaspoon vegetable herb mix or Herbes de Provence
¼ cup olive oil
1 tablespoon red wine vinegar
½ bunch basil
Zest of 1 lemon
1 tablespoon chives — finely chopped
½ lb baby arugula
6 oz black olives — pitted
1 bunch chives — finely chopped